26% of the web is built on WordPress and with good reason. Whether you are an experienced developer or HTML illiterate, WordPress provides an amazing base from which virtually anything can be built.
As a local business owner or marketer for local businesses, there’s a good chance you fall closer to the “HTML illiterate” side of that equation, and that’s okay.
In this guide, we’ll be taking you step-by-step through the process of optimizing your local business SEO via WordPress. We’ll show you every plugin and tool you need to maximize the benefits while minimizing the time and money you’re required to invest.
This process is a crucial step of the SEO process Be Top Local used to take a Utah business to $100k in monthly profits.
Everything in this guide can be completed in less than an hour. That said, you will probably want to take a bit more time on some of the sections in order to better understand them. Whether you churn and burn or turn this into a more well-rounded learning experience, you WILL have an SEO optimized WordPress website by the end!
If you’d rather just download this guide as a convenient PDF checklist, click below:

But first, let’s quickly discuss why WordPress is the right choice…
You’re Better Off On WordPress
There are only two types of people for whom WordPress might NOT be the right choice:
- People who don’t plan to make money via their site and have zero time to learn the most basic of web skills.
- People who are making so much money they can outsource 100% of their website activity to a high-end development and marketing agency.
In other words, if you plan to make between $1,000 – $500,000 per month via your website, WordPress is ALWAYS the right choice for you.
Here’s why:
- Very low learning curve
- Unlimited control and customization possibilities
- Dedicated team keeping platform security up to speed
- Over 10,000 themes to build from
- 44,000+ plugins let you do virtually anything with zero development skills
- Trusted by over a quarter of the web
- Endless community tutorials and Q&A’s help you accomplish anything desired
Put simply, no other platform offers the same level of both simplicity and flexibility. WordPress adapts to your skill level, letting you do as much or as little as you want and end up with an excellent result every time.
Premium themes are cheap ($50-100) and many will give you a solid SEO structure, clean code, and high load speed right out of the box. I’d personally recommend StudioPress as their Genesis framework is optimized for SEO and their selection of themes are head and shoulders above most.
If you aren’t currently on WordPress and are interested in taking your local SEO and online marketing seriously, it’s probably worth your time and effort to make the switch.
Ground ZERO: Optimize Your Site Speed
Let me put it this way. If your site is slow, you lose sales.
As many as 25% of visitors may abandon a site after just 4 seconds of load time, and it’s recommended that your site’s pages take no longer than 4 seconds to load in order to maximize retention.
If you aren’t sure where you website stands on speed, simply enter a page URL from your site into this speed test tool from Pingdom.
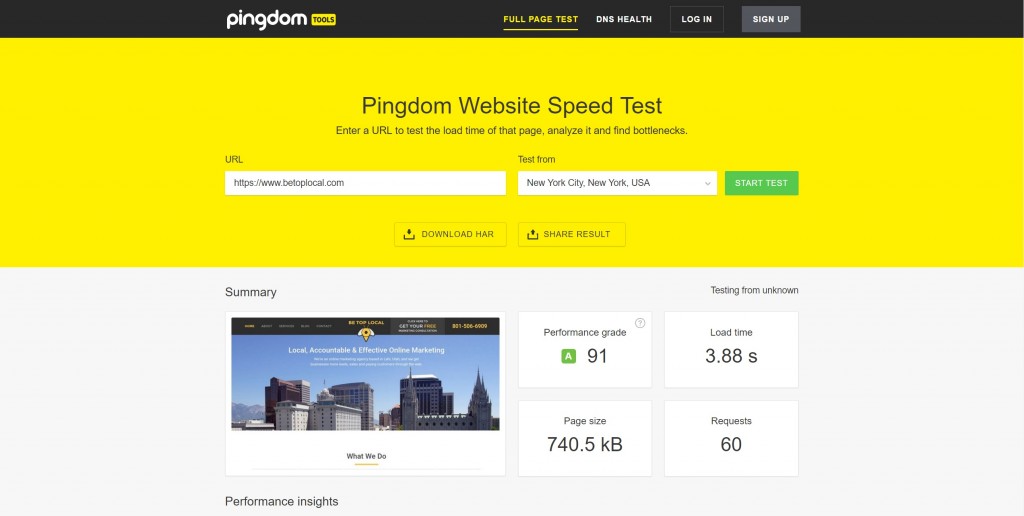
If you are getting load times in excess of 4 seconds, it’s definitely time to act.
Here’s how, with a few insights via Gregory Ciotti:
Step 1. Choose a good host
Site speed starts with good hosting. If you have a relatively small website (less than 20 pages) and check off all the other boxes on this page but still can’t get load times of under 4 seconds, the problem is probably your hosting.
For smaller businesses, Siteground for WordPress and even Godaddy for WordPress are solid options. If you are a bit larger, making a good bit more money, and want something a bit more high-end, WP Engine comes highly reviewed.
Step 2. Use an uncluttered theme/framework
If you wish to use one of WordPress’ free default themes, that is completely fine. The default framework is lightweight and works fine for most sites. Fantastic premium alternatives include StudioPress, as I mentioned earlier, Thesis Themes, and Elegant Themes.
Again, before you worry to much about your existing theme or hosting, work through the rest of this list and then come back to this if you still aren’t getting good results. If you are starting from scratch, I’d highly recommend spending the extra $100 to go with one of the premium options above.
Step 3. Use an effective caching plugin
Proper caching can have a massive impact on site load speeds. For great performance without needing to learn anything, just install W3 Total Cache, activate it, and call it a day.
Step 4. Optimize images (automatically)
Large images have been the bane of website load times since the earliest days of the internet. With today’s technology, however, unoptimized images is usually a product of ignorance rather than a lack of means.
Thanks to the WordPress community, you can retain your ignorance and still optimize your images. Simply install the WP-SmushIt plugin and watch your load time decrease. The plugin compresses your images without sacrificing quality,
To get more advanced…
That’s the basics of optimizing for site speed and should cover everything you need for a small to mid-sized website. If you have followed all four steps and are still unsatisfied with your load speeds, check out Ciotti’s article for more optimization techniques.
Local Business SEO 101: Pick The Right Keyphrases
All SEO starts with keyphrases, and local SEO is no different. You can’t position your website correctly unless you know what people are searching for.
Are people searching more often for “local roofing company” or “affordable roofing”? Are they searching by brand name for your competition or looking for a generic solution? The answers to these questions will dictate your strategy.
SEO is a $65 billion industry, so as you imagine, there are some fairly complex strategies and expensive tools you can use to increase your rankings, but that’s not what we’ll be focusing on.
For the purposes of local SEO, we want something simple, cheap and effective. Fortunately, Google gives us virtually everything we need.
Step 1: Brainstorm what your customers are searching for
The first step is to get in the mind of your customers. What are they searching for when they want to find a business like yours?
Come up with a list of 5-10 possible phrases.
For example:
If you own a roofing business in Atlanta, your target customers might search the following phrases:
- Fix my roof
- I need new roofing
- Atlanta roofing company
- Affordable roofing
- Best roofers in Atlanta
Once you’ve come up with at least 5 phrases to test, its’ time for phase 2.
Step 2: Enter phrases into Google search
Go ahead and enter your brainstormed phrases into Google search. As you begin to enter them, Google will automatically attempt to predict what you’re searching for based on other popular searches.
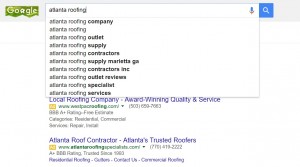
This immediately gives you a host of other keywords to add to your list. Try entering in each of your brainstormed phrases and looking through the new suggested keyphrases for options a prospective customer might use.
Once you’ve fully entered the phrase, scroll to the bottom of the page for another batch of suggested keyphrases.
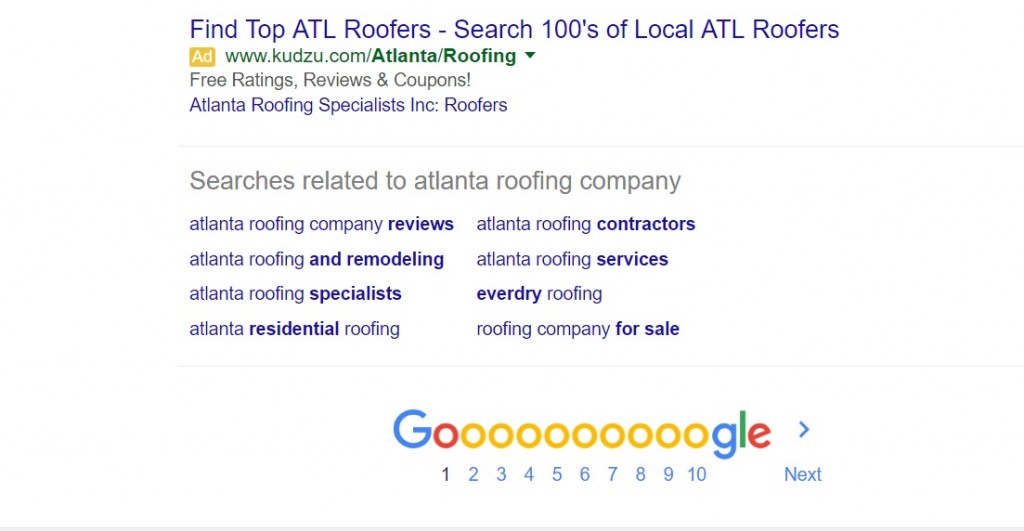
There will probably be a fair amount of overlap between these two methods, but keep doing this until you have around 30 total keyphrases on your list.
Step 3: Enter list into Keyword Planner
Next, head on over to Google Adword’s Keyword Planner, and copy/paste your list into the “search for new keywords” section.
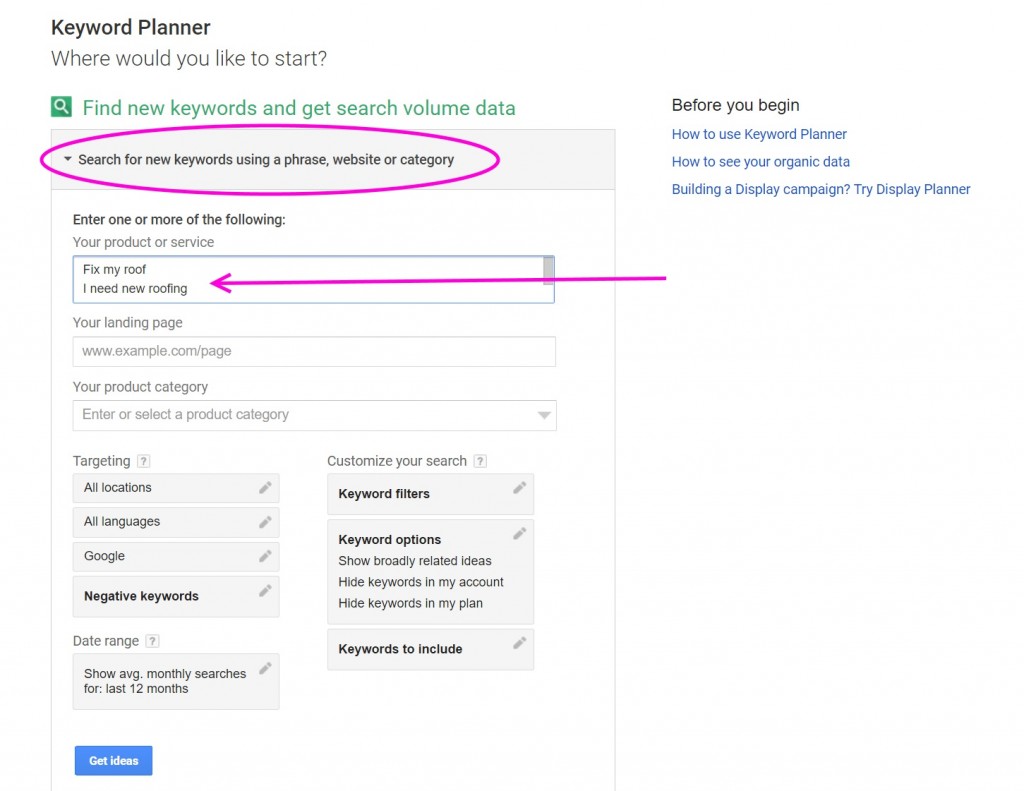
This search will generate traffic volume for your selected keyphrases as well as suggesting new keyphrases and displaying traffic data, keyphrase competitiveness, and the average PPC bid for each phrase.
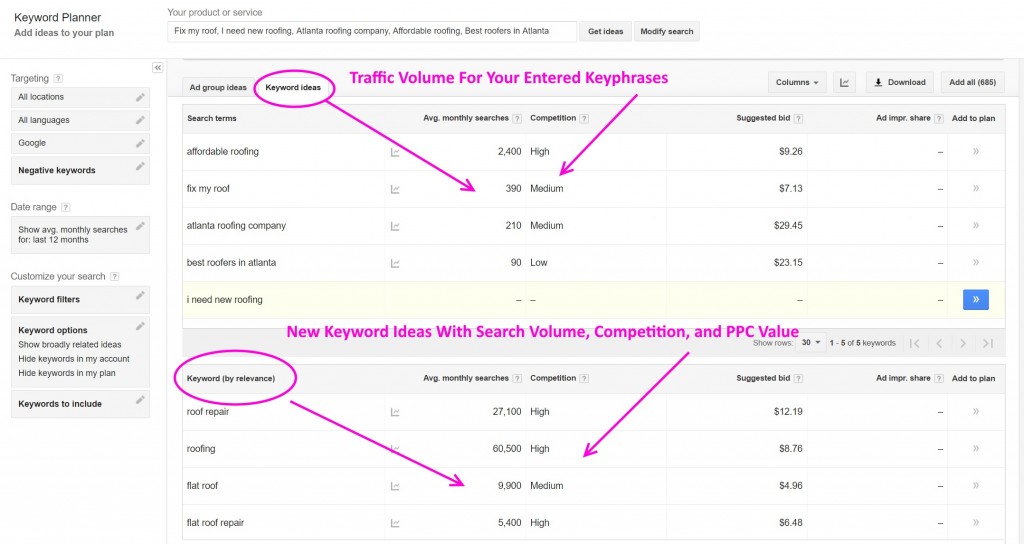
Your list of keyphrases will now be ranked by volume and you can use this info to target the most popular phrases on your site (as we’ll discuss throughout the rest of this guide).
Typically, keyphrases that show around 300 “Avg. monthly searches” and don’t say “High” under the “Competition” section make for good targets. You’ll want to come out of this process with at least 10 keyphrases that get between 200-1,000 monthly searches and are highly relevant to your business.
To get more advanced…
If you’re at the point where you have already implemented most of these steps and you are looking for more advanced keyphrase research strategies, check out this guide from Brian Dean.
SEO 3000: Optimize Your Site-wide Settings
Once we’ve identified our keyphrases, it’s time to optimize our website around those phrases. In other words, we are trying to set up our website so that when Google’s bots scan us for indexing, they are attaching our site to keyphrases like “Atlanta roofing company” and “fix my roof Atlanta”.
The best part about this step is that it’s completely in our control. We can do everything from our own WordPress dashboard. Simply follow these steps.
Step 1: Install an all-purpose SEO plugin
Once again, the best part about WordPress is that there are so many plugins that make life easy. When it comes to site-wide SEO setup, there are several plugin options that will do virtually all the heavy lifting for you.
The two most popular options include:
My personal favorite is Yoast SEO, so that’s the one I’ll pull screenshots from in this tutorial, but both plugins will do essentially the same thing with only a few variations here or there.
Step 2: Set your homepage meta data
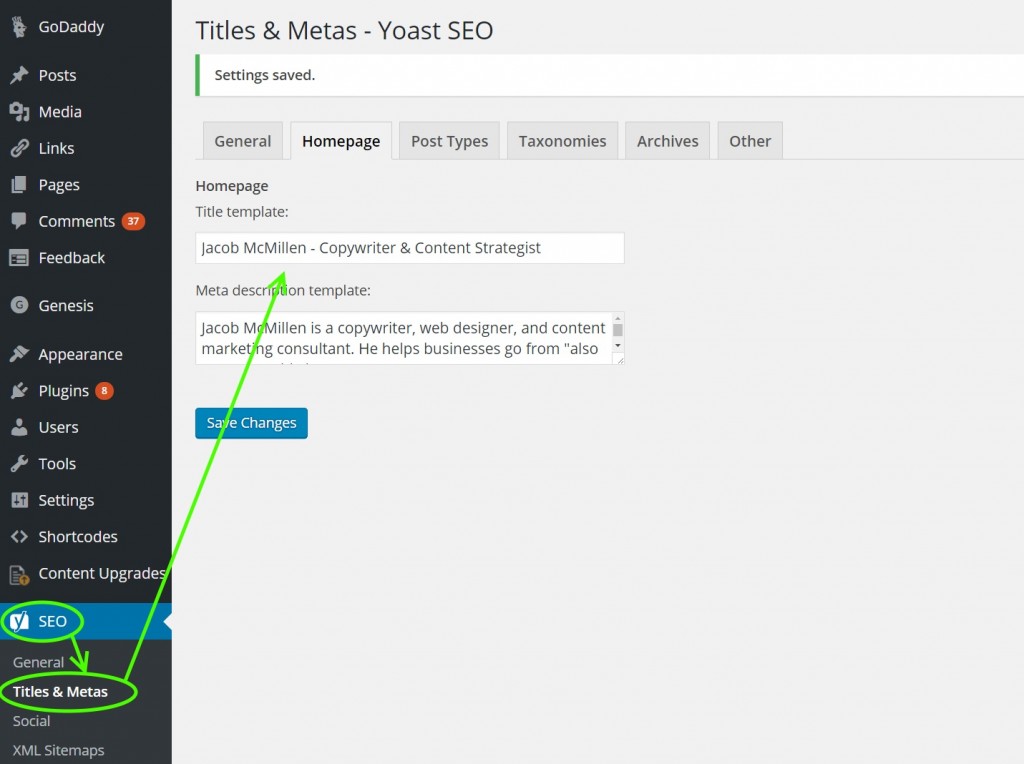
Your meta data is the core information sent to Google and other search engines concerning your website. When we talk about meta data in the context of SEO, we are typically talking about your domain’s title and description.
You’ll want to include your brand name and your top keyphrase in your site’s meta title, while limiting the total character count to around 67 characters.
For your meta description, follow these guidelines:
- Keep it around 135 characters
- Use action-based wording and include a direct Call To Action (CTA)
- Make sure to include your primary keyphrase
In order to enter your homepage meta data, look for “Titles & Metas” in your Yoast SEO plugin settings or a similar variant if you are using a different plugin.
Step 3: Adjust your permalinks
Your permalinks are the way WordPress configures your URLs for new posts and pages. The default setting typically includes some sort of date, category, or other data in the URL which isn’t optimal, so we’ll want to change that right off the bat when setting up a new site. If your site is older and already has a ton of content, you can either skip this step or follow the directions here.
Simply go to Settings > Permalinks and then check the bubble next to “Post name” – http://yourdomain.com/sample-post/
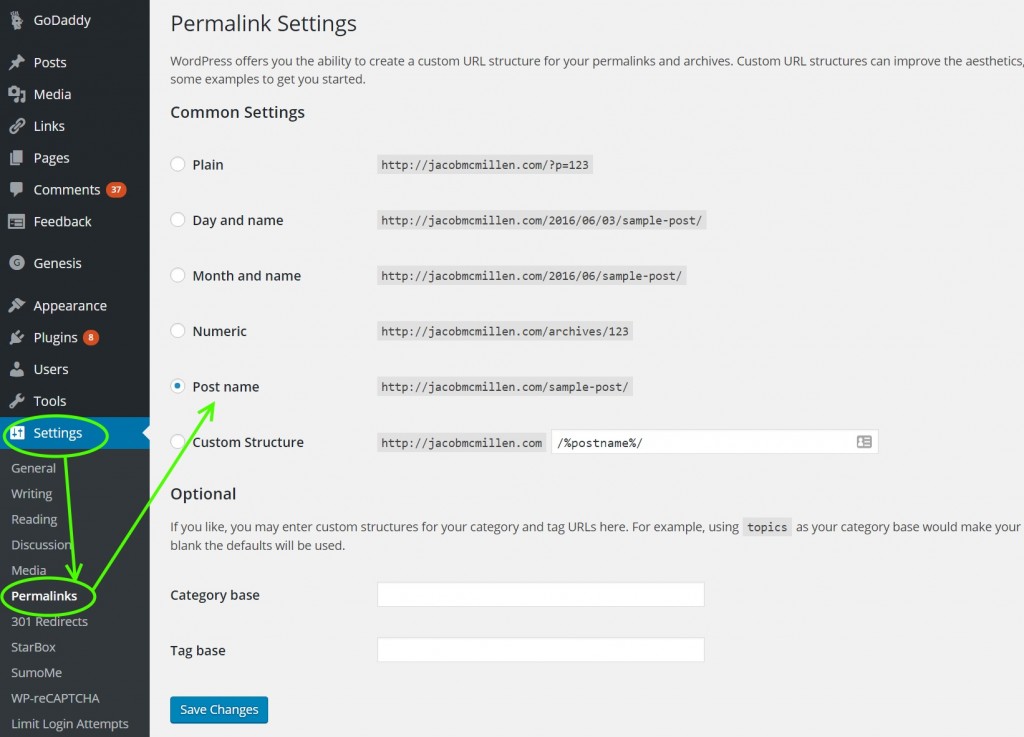
Shorter URLs are usually better for SEO purposes as well as for usability. There is no advantage to having extra dates, archives, random numbers, or other data inside your URLs, so it’s best to eliminate that data.
Step 4: Verify your sitemap is live
One of the core steps in SEO setup is putting up a sitemap. This used to be done manually, but today, your all-purpose SEO plugin will do it for you.
You do, however, need to verify that the plugin has setup your sitemap correctly. For some reason, this particular step tends to misfire for every other site one builds, so it’s important to go ahead and click-through to your sitemap to confirm that no troubleshooting is required.
If you are using Yoast SEO, simply enter “yourdomain.com/sitemap.xml” into your browser to view your sitemap. It should look something like this:

To get more advanced…
These are the basics that you need to start getting ranked, and frankly, this is all most sites will need in terms of sitewide SEO setup.
That said, there is a TON you can do to configure your SEO plugin. If you’d like to see just how much your plugin is capable of up, check out this guide by Yoast.
SEO 4400: Optimize Your On-Page SEO
Now that we’ve taken care of the general, sitewide settings, it’s time to tackle the most important part of SEO site optimization.
On-Page SEO
Your proficiency in on-page SEO will play a massive role in dictating your site’s success. Furthermore, if you implement effective strategies as you create new pages, you can save yourself from having to invest a TON of time down the road in going back through hundreds of pages and making necessary changes. This phase can be accomplished in 10 mins for a single page, but if you are having to go back through and optimize multiple pages, then the entire process can, of course, take quite some time.
So what is on-page SEO?
In a nutshell, on-page SEO is the process of setting up an individual webpage to rank for a desired search keyphrase and its similar alternative phrases. This isn’t the same keyphrase you used to optimize your homepage. Each page will be optimized around its own keyphrase from that list of 30 we selected earlier.
The optimization process involves a number of key elements, and there’s a lot to cover, so let’s get started.
Step 1: Optimize your page title
The single most important part of any webpage is the title. This is what attracts both Google and actual users to that page.
In order to please Google, start the title with your target keyphrase and then follow it up with a compelling headline that will communicate the page’s benefit to your target audience.
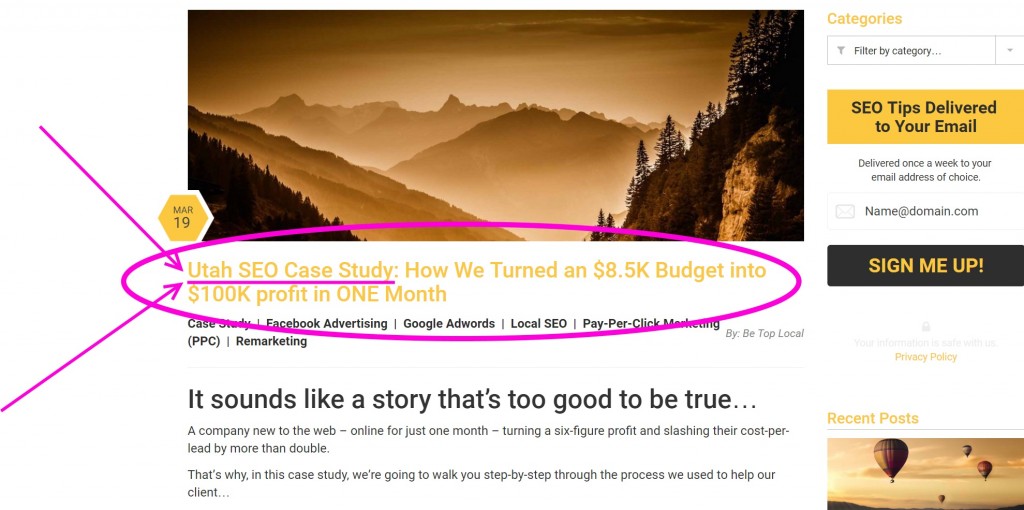
For example, on above page, Be Top Local wanted to rank for “Utah SEO case study” while also attracting its target audience – Utah business owners. Accordingly, they began the post with the desired keyphrase and then followed it up by discussing actual results they achieved for a client in their target segment.
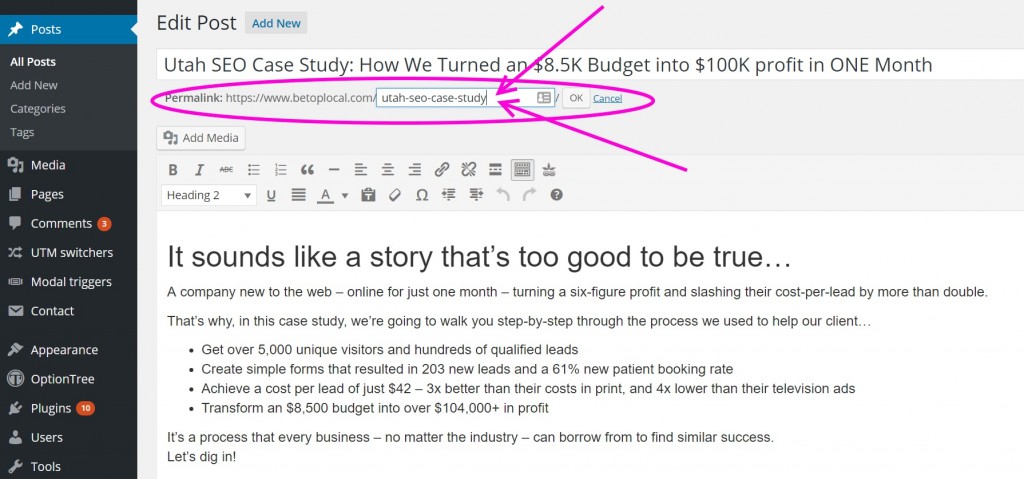
Step 2: Optimize your URL
Remember how we changed our permalinks so that the URL would be “yourdomain.com/post-name”?
Well that’s good, but we want to manually make it even better. After you have created your title, go ahead and click on the URL section just below in your WordPress dashboard and edit the URL to ONLY include your targeted keyphrase. In other words, simply delete the extra headline that follows the keyphrase in our example above.
Step 3: Include an attractive image
People like images. Including an image at the beginning of a post tends to decrease bounce rates, which means Google also likes images. Plus, you’ll want an image to pop up when someone shares your URL on social media.
Include a nice image in your posts. Simple.
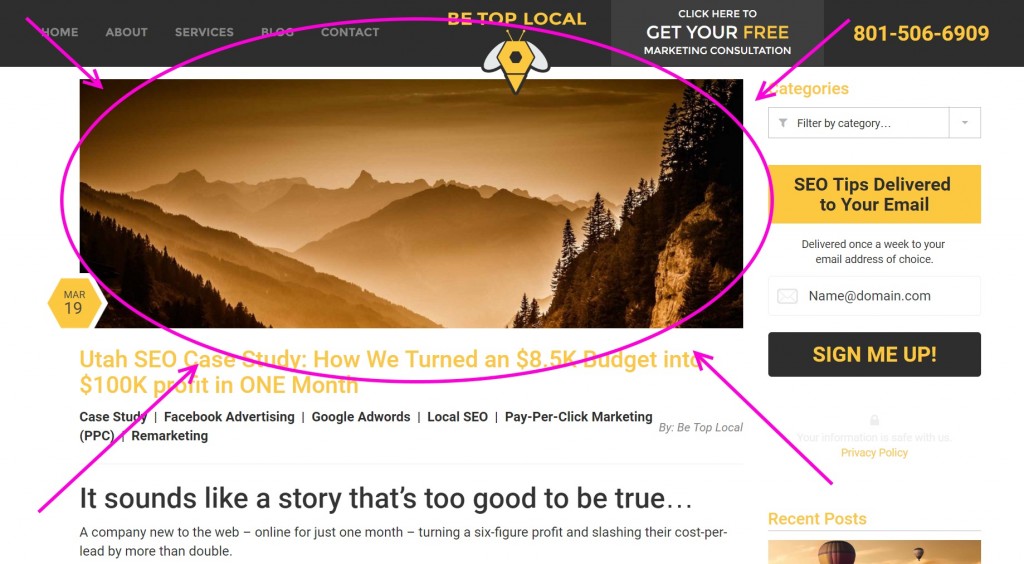
For some themes, including an image in the “Featured Image” section of your post will automatically display it at the start of your post. For other themes, you’ll need to also add it at the top.
You also aren’t limited to an image. Video can be just as (if not more) effective but also comes with a higher investment cost if you are creating your own videos.
While you don’t necessarily need multiple images, it is always nice to include visuals in an article. It also gives you an opportunity to rank your page via Google’s Image Search function. Just be sure to always include “Alt Text” titles for each image that include your target keyphrase.

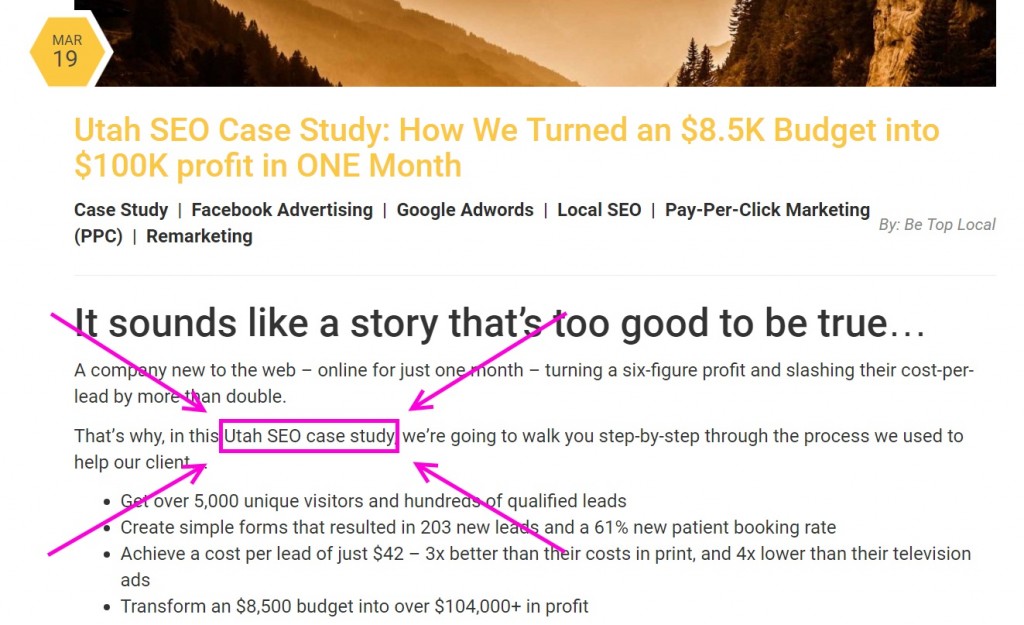
Step 4: Mention your keyphrase in first 100 words of content
This is pretty straightforward but often overlooked. I actually overlooked it in the article we’ve been using for our example, so I just added it in. Be sure to include your target keyphrase at some point within the first 100 words of your post.
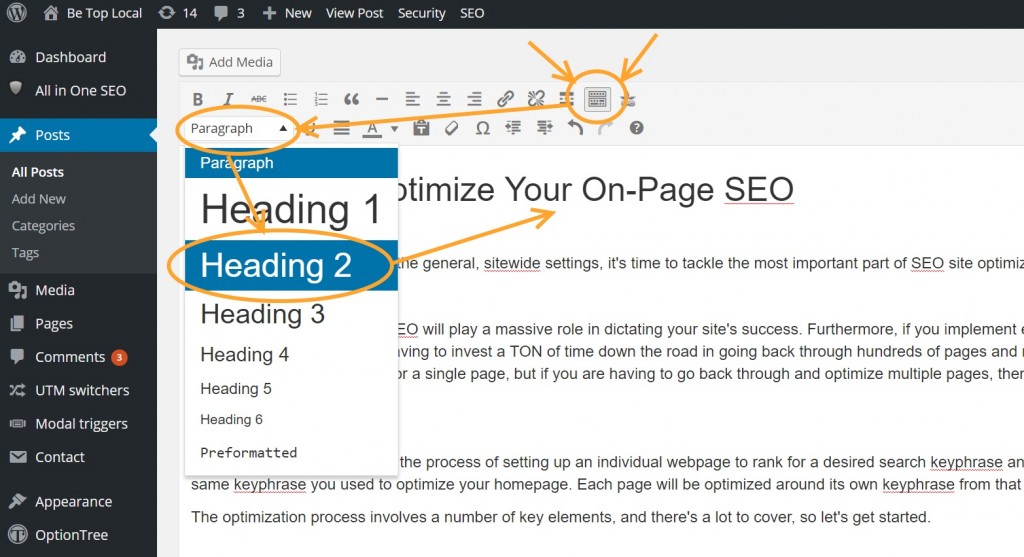
Step 5: Use H2 tags for subheadings and include your keyphrase in one
Your primary subheadings should use the “H2” tag. To include this, you’ll need to toggle the tooblar in your WordPress post editor and then select “Heading 2”.
At some point within your post, include your target keyphrase within one of the subheadings.
Step 6: Include internal links
As your domain’s authority grows (as well as the authority of various pages), it’s important to utilize that authority to help rank your other pages. The key to accomplishing this is to interlink your pages to each other via the targeted keyphrases.
In other words, if I want to help rank that “Utah SEO Case Study” article, I will use new articles (like this one) to link to that page from phrases that either directly relate to that target phrase, like this – Utah SEO Case Study – or with a similar, relevant phrase, like this – “the importance of SEO for local Utah businesses“.
When you add a new post, be sure to go back through old articles and link to the new post. For example, when I’m done with this post, I’ll go to Be Top Local’s local SEO link building post and include a link to this new article, using this article’s keyphrase as anchor text.
Step 7: Include outbound links
As you may have noticed, the most in-depth articles often link out to multiple authoritative sites in order to direct their readers to additional resources. Google has caught on to this and uses those outbound links as a gauge for your page’s key topic.
Make sure to include a few outbound links to highly relevant sources within your post.
Step 8: Evaluate your keyphrase saturation
In addition to the previous keyphrase inclusions we’ve covered – Title, first 100 words, image Alt Text, Subheading – we also want the page’s content to include this keyphrase with a certain frequency. As Google has become more sophisticated, however, simply throwing in a bunch of phrases has become more and more risky. Instead, you’ll want to include the actual keyphrase only a handful of times, but ALSO include a number of similar phrases (referred to as LSI Keywords).
Frankly, it’s a bit complicated to keep up with the appropriate frequency of keywords, so I just use Yoast SEO’s built-in analyzer to gauge it for me.
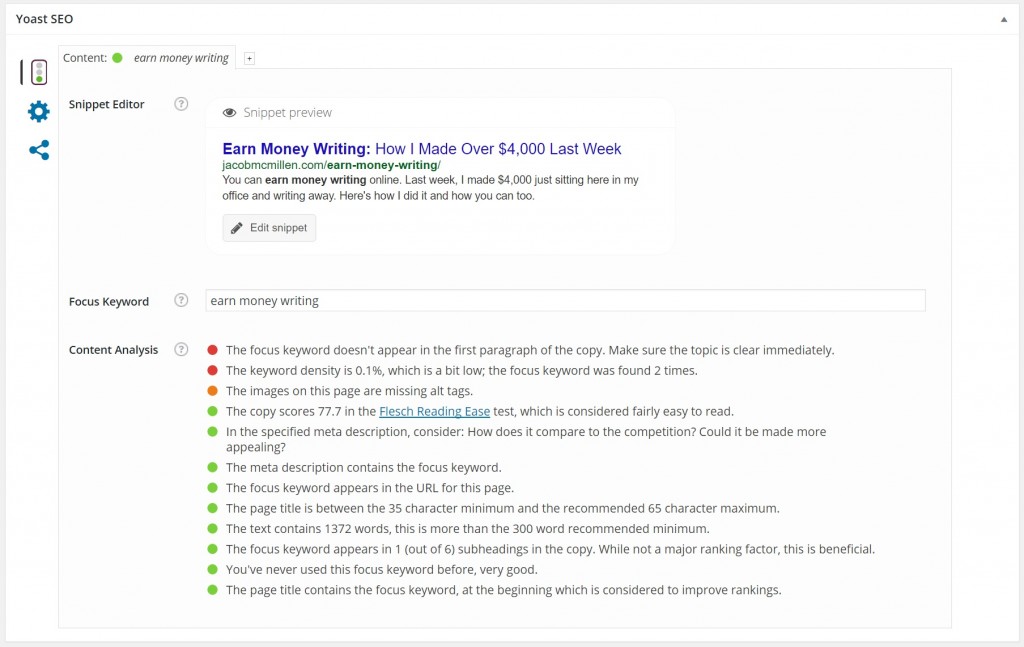
As you can see, not only does this tool give me a general gauge (red light, yellow light, greenlight), but it also gives me specifics on what I’m doing right and what I’m doing wrong within the page’s content. You’ll see many of the steps we’ve discussed mentioned under the “Content Analysis” list.
Step 9: Optimize your meta description
Just like we had a meta description for our homepage, it’s important to include a meta description for every new page we create. Google will automatically pull the first 135 or so characters from your page if you don’t provide a meta description, and those initial characters probably won’t provide an optimized hook to real in searchers.
The SEO plugin you selected will include a spot for your meta description at the bottom of each post. Here’s an example using All-In-One SEO Pack:
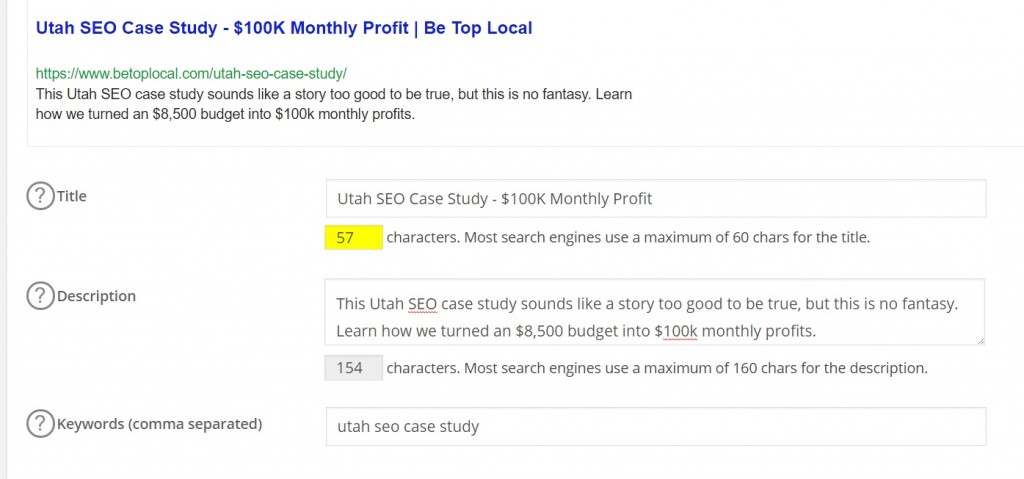
Remember to include the same ingredients from your homepage meta description, but unique to this page:
- Keep it around 135 characters
- Use action-based wording and include a direct Call To Action (CTA)
- Make sure to include your primary keyphrase
Step 10: Include prominent social share buttons for blog content
While this won’t apply to every webpage, it’s important to make social sharing incredibly easy for your site visitors. While shares don’t directly increase your ranking, more shares equals more visitors equals more backlinks equals higher rankings.
In other words, getting social shares is very good for your site, so make it easy.
There are a wide variety of plugins you can use for this. If you want something quick, easy, and free, I’d recommend SumoMe’s Share bar.

Get more advanced…
That’s probably everything you need to know about on-page SEO, but if you want to dig even deeper, check out this in-depth guide from Moz.
Conclusion (And PDF Checklist)
Believe it or not, with a little practice, you can do everything we covered on this page in under an hour. As you make instituting on-page SEO a habit, you will be able to optimize new pages in as little as 15 minutes.
If your site has been around for awhile, it might be a bit more difficult. The more content you have already, the longer and trickier this process can be (that’s where you might consider hiring a local SEO specialist).
Go ahead and get started implementing these steps for your business. We’ve even turned this guide into a handy checklist you can reference at your convenience. Click below to download it free!

By the way, can you guess what our target keyphrase was for this article?
Once you’ve finished optimizing your website, you’re ready to continue forward in your SEO journey. Head on over to our Local SEO Tips series for your next steps.


